

Create Your First Survey
A full walkthrough of the builder — from template to live survey, with a worked example.
Step 1 - Choose a template
Go to Surveys and click Create new survey. The Template survey page opens.
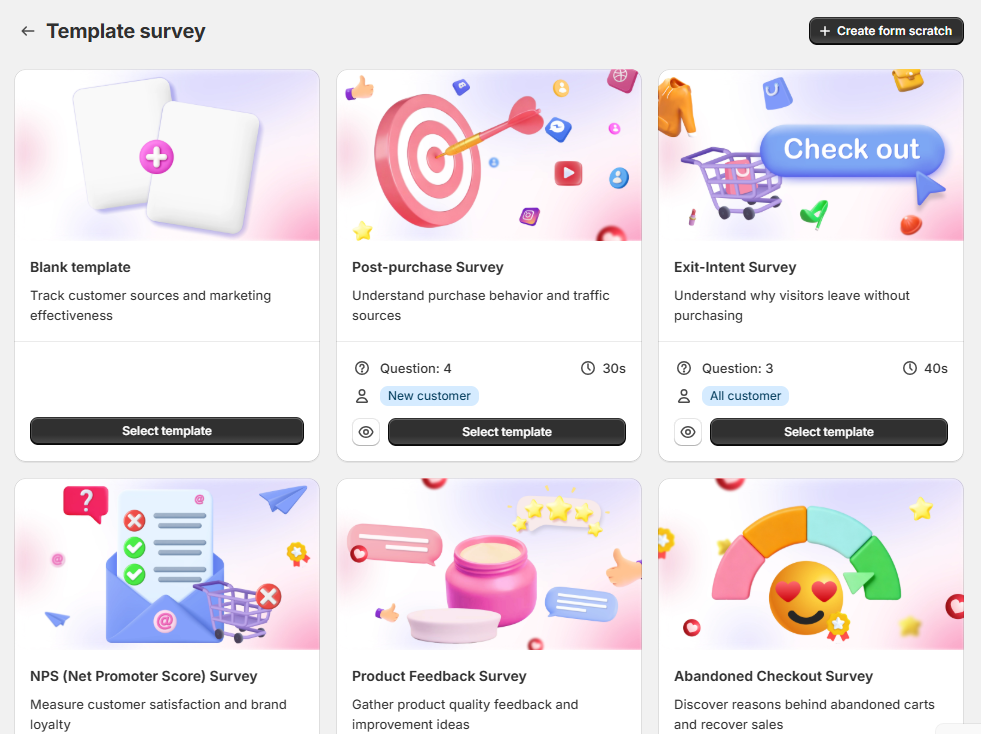
Choose the template closet to your goal:
Blank template - Start from an empty survey and add your own questions
Post-purchase Survey - Understand purchase behavior and traffic sources
Exit-Intent Survey - Understand why visitors leave wothout purchasing
NPS (Net Promoter Score) Survey - Measure customer satisfaction and brand loyalty
Product Feedback Survey - Gather product quality feedback and improvement ideas
Abandoned Checkout Survey - Discover reasons behind abandoned carts and recover sales
Each card shows the number of questions, the estimated time to complete and the default audience. Click the eye icon to preview a template, then click Select template to open it in the builder. To start with an empty survey, choose Blank template or click Create form scratch in the top right.
The survey builder at a glance
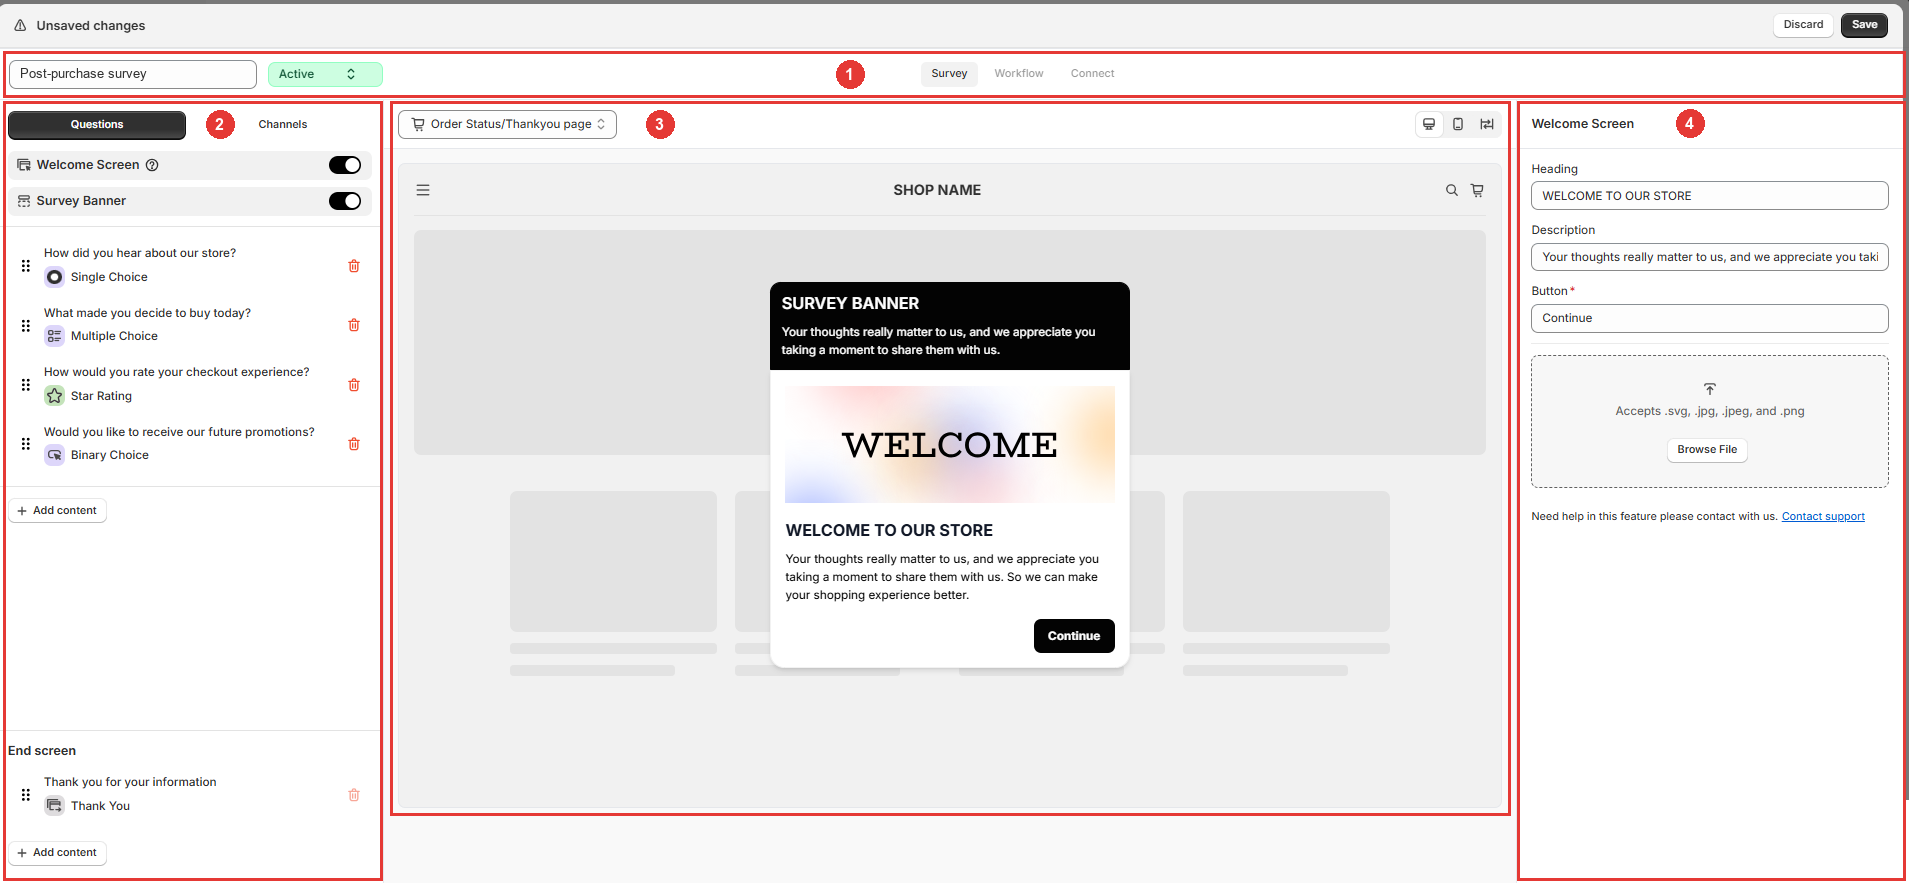
Top bar - the survey name, the status, and three tabs: Survey (content and channels), Workflow (branching logic) and Connect (send this survey's responses to Google Sheets)
Left panel - the Question tab (the content of your survey) and the Channels tab (where it appears)
Preview - shows the survey as customers will see it
Settings panel - edit the item you selected in the left panel
Step 2 — Name the survey and set its status
Enter a Survey name. It is only used inside the app to identify the survey - customers don't see it
Check the Status next to the name:
Active - the survey is shown to customers as soon as you save
Inactive - the survey is save but not shown
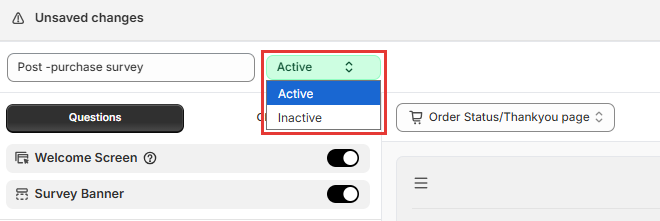
New surveys are set to Active by default. Switch to Inactive if you want to keep working on the survey before customers see it
Step 3 — Edit the survey content
In the Question tab, items are listed in the order customers see them. Click any item to edit it in the settings panel on the right
Welcome Screen - an optional intro screen with a heading, description, button and image. Turn it on or off with the toggle
Survey Banner - an optional banner shown above the survey. Turn it on or off with the toggle
Question - each row shows the question and its type, for example Sigle Choice
End screen - the message customers see after the finish, for example Thank You
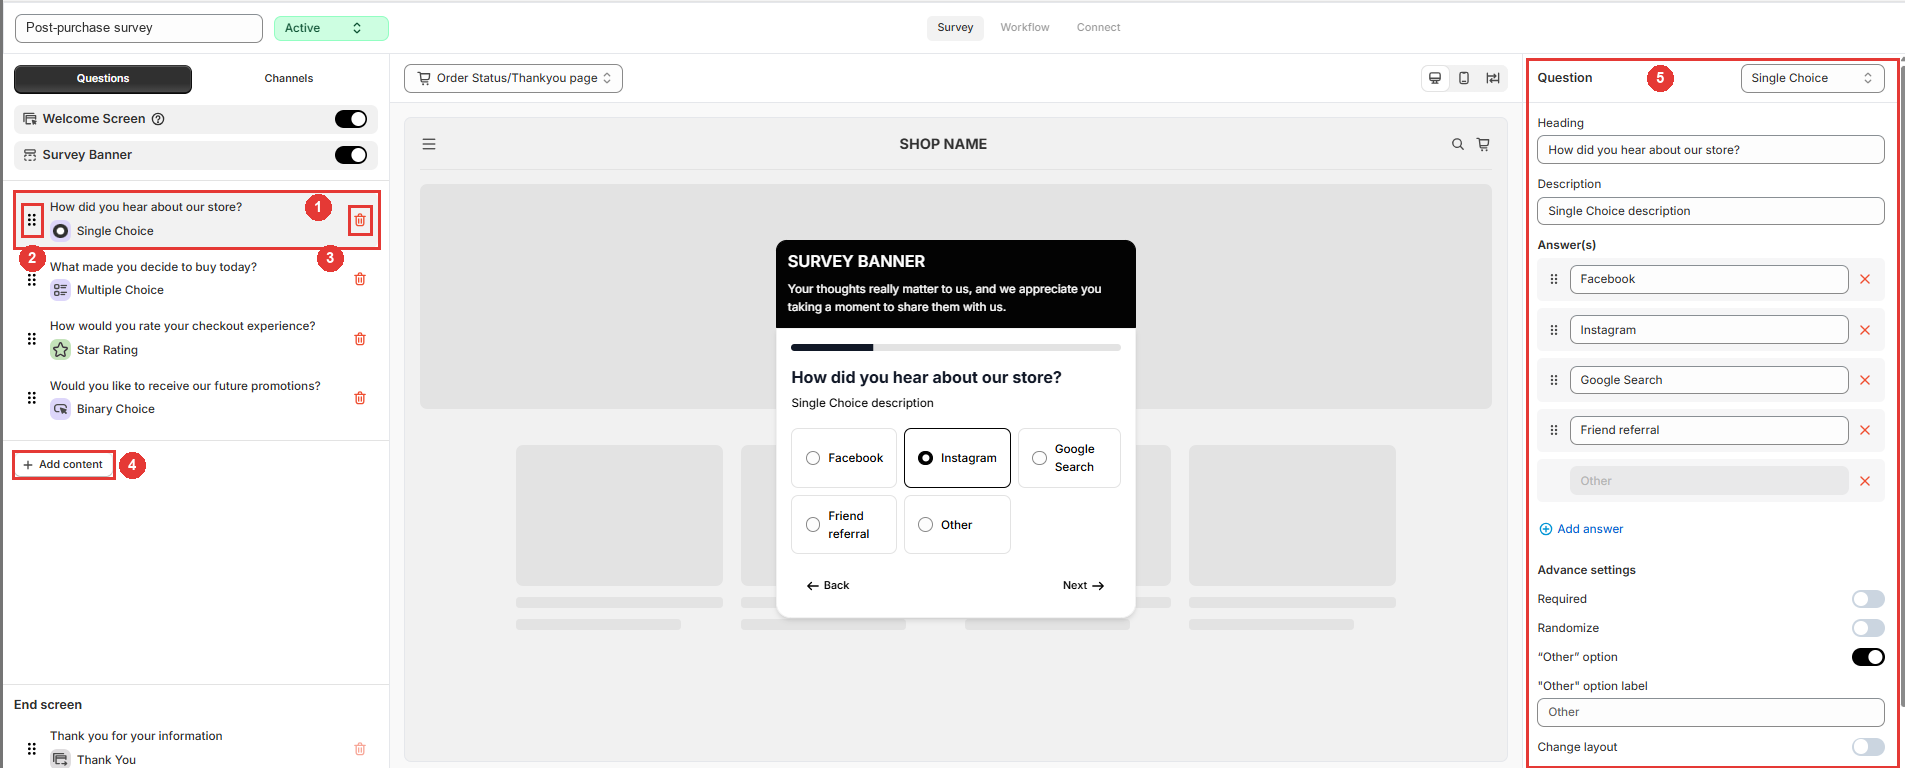
To work with questons:
Click a questions to select it
Drag the handle on the left to change its order
Click the bin icon to delete it
Click Add content below the list to add a new question
Edit the selected question in the settings panel on the right:
Question type - change the type with the dropdown at the top of the panel (for example Single Choice)
Heading and Description - the question and an optional hint shown below it
Answer(s) - edit, reorder or remove the answer options. Click Add new answer to add one
Advance settings - Required (customers must answer to continue), Randomize (shuffle the answer order), "Other" option (adds an Other answer with your own label) and Change layout.
The preview updates as you edit, so you can check each change right away.
Step 4 — Choose where the survey appears
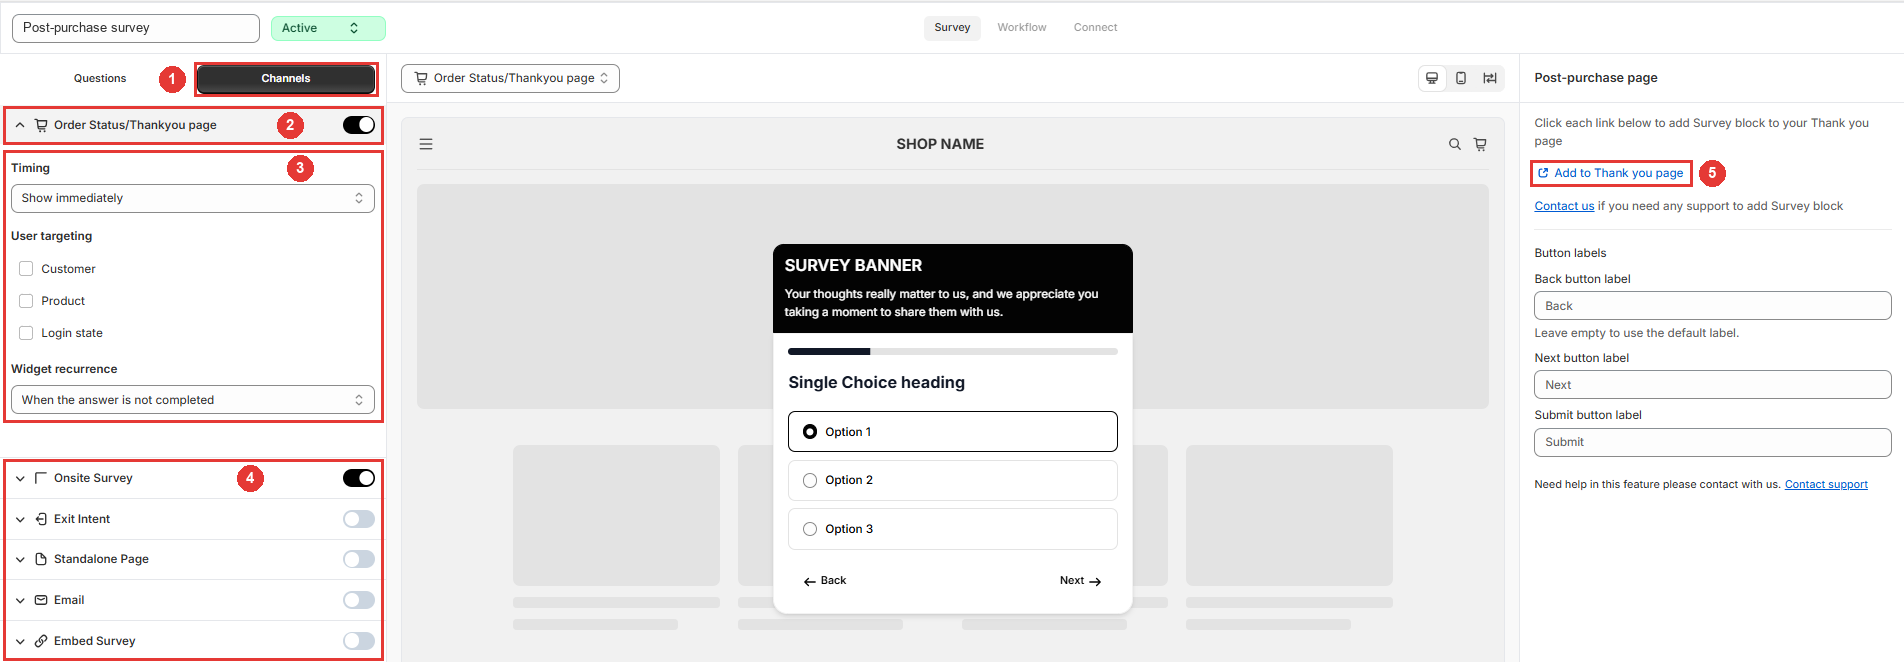
Click the Channels tab in the left panel.
Turn on the toggle of each channel where you want to show the survey. A survey can run on several channels at once.
Click the arrow next to a channel to expand its settings, such as Timing, User targeting and Widget recurrence.
Check the other channels. Templates turn some channels on by default - turn off the ones you don't need.
Complete any extra setup shown in the settings panel on the right. For example, the Order Status/Thankyou page channel asks you to click Add to Thank you page to add the Survey block to your checkout.
Channel | Where customers see it |
|---|---|
Order Status/Thankyou page | After checkout, on the Thank you page. |
Onsite Survey | A widget on the storefront pages you choose. |
Exit Intent | When a visitor is about to leave the store. |
Standalone Page | A page with its own link you can share anywhere. |
An email sent automatically after an order. | |
Embed Survey | Inside a section of your theme. |
A survey on the Order Status/ Thank you page channel only appears after you add the Ego Surveys block to your Thank you page. Turning on the toggle alone is not enough. Click Add to Thank you page, then in the checkout editor search for Ego Surveys, click (+) next to the block, and click Save. See Thank You & Order Status Page Surveys for details.
Step 5 —Preview and save/test
Check the survey in the preview. Use the channel dropdown to see it on each channel, and the device icons to switch to the mobile view
Click Save in the top bar
Once saved, an Active survey starts showing on the channels you turned on
To test, place a small test order in your store — the survey appears right on the Thank you page. Your answer shows up under Responses within moments.
Still need help?
Our support team is available 24/7. Contact support →